  The post How to Write Blog Posts That Get Read and Shared appeared first on Top Dog Social Media. How to Write Blog Posts That Get Read and Shared published first on https://themarketingheaven.tumblr.com/ via Tumblr How to Write Blog Posts That Get Read and Shared
0 Comments
What is “black hat”? A villain. Or, an underhanded trick or technique that breaks a rule or set of rules. If you’re engaging in black hat on social media, that means you’re trying to make your accounts look better than they really are. This could include…
Tisk, tisk, tisk. How shady. And, not a good business idea either. Bonus: Get the step-by-step social media strategy guide with pro tips on how to grow your social media presence. Why black hat is badIt’s lazy. It does more harm than good. And… It can ruin your reputationPeople engage with you on social media, based on truth. If they find out you’re trying to dupe them, kiss your reputation and followers goodbye. There’s no real gains, anywayYour fake followers won’t stay around very long. They aren’t even real people, interested in your products or services. Forget about trying to impress with inflated audience numbers that don’t deliver real value. Trade that black hat in for a white one. Be the do-gooder. Still not convinced? Some specifics… 5 black hat tactics to avoid on social media1. Buying followersWhat is it?Just like it sounds, buying followers for your Twitter, Facebook, Instagram, or other social media platforms. Versus growing and grooming them, naturally, over time. Why avoid it?
Instead…
2. Posting the exact same content across networksWhat is it?
Instead…
3. AutomationWhat is it?Using bots to win followers, derive backlinks, gain ‘likes’, and generate comments. Why avoid it?
Instead…
4. Spamming social networksWhat is it?Posting unrelated, extraneous, and otherwise irrelevant links on Twitter, Facebook, Instagram, or wherever. Sure, go postal on social, but be real and do with intent. Why avoid it?
Instead…
5. Sharing shady pages or content that employ any of the following tricks…5.1 Stuffing keywordsWhat is it?A shady technique to manipulate a site’s search ranking. By adding keywords and phrases galore to your web pages, even ones irrelevant to content on the website. Such as…
Why avoid it?
Instead…
5.2 Hidden textWhat is it?Any text search engines can view, but readers can’t. Web site administrators use hidden extra and irrelevant keywords to boost page rankings. Want to mess with search engine guidelines? Here’s how…
Are you doing these? Don’t. Why avoid it?
Instead…
5.3 Buying or exchanging linksWhat is it?Buying links or exchanging links with other sites. The more links back to your pages, the more relevant you are, right? True that… as long as they’re related to the content on your site. Otherwise, you’ll look foolish and silly once more. Why avoid it?
Instead…
Solid links increases your chances to form a friendship, partnership, or further mentions. None of that will happen when choosing and using links unwisely. 5.4 CloakingWhat is it?It’s a website returning altered pages to search engines crawling your site. Meaning, a human would see different content and information than what search engines would see. Websites cloak content to improve search engine ranking. Why avoid it?
Instead…
5.5 Article spinningWhat is it?A technique for creating the illusion of fresh content. A software program ingests a single article, munches on it, then pukes out a few different articles. Yuk, huh? New articles appear on your site, with new words, phrases, and terms—fooling search engines. And it might get passed some search engines. But humans will know… Why avoid it?
Instead…
5.6 Using Doorway pagesWhat is it?Doorway pages (also known as Gateway pages) are keyword-rich, content-poor pages designed to trick search engines. They contain loads of keywords, but no real information. They focus on calls-to-action and links that send the users through to a landing page. Why avoid it?
Instead…
See the Black Hat pattern?Break the rules, pay the dues. People, social networks, and search engines will know if you’re breaking the rules. Your reputation and rankings will take a hit. Affecting your site and social accounts for days, weeks—maybe forever. People will stop following you. Your brand will sour. What are you going to tell your boss then? Feeling lonely out there in the world of social media? Need more followers and want to be the hero, not the villain? Hootsuite has tools to help you schedule, publish, and monitor content across your channels. Try it for free. The post 5+ Black Hat Social Media Techniques Your Brand Shouldn’t Use appeared first on Hootsuite Social Media Management. 5+ Black Hat Social Media Techniques Your Brand Shouldn’t Use published first on https://themarketingheaven.tumblr.com/ via Tumblr 5+ Black Hat Social Media Techniques Your Brand Shouldn’t Use When you start planning a social media campaign, one of the first things you need to figure out is what network—or networks—you’re going to run it on. Not all social media platforms are the right fit for every campaign, but you can get real results by figuring out which combination is best for your brand. I spoke to Hootsuite’s expert social media team—Social Media Specialist Christine Colling, Global Social Engagement Specialist Nick Martin, and Social Marketing Lead Amanda Wood—to find out top tips and tactics for running a successful cross-platform social media campaign. Continue reading to discover:
Bonus: Get the step-by-step social media strategy guide with pro tips on how to grow your social media presence. How to run a cross-platform social media campaignWhy you can’t just post the same message across networksWhile you may have read the title of this post and said “Easy! Just copy and paste the same content to all my different networks, duh” it’s my civic duty to tell you that you’re misguided. Have you ever seen what it looks like when somebody uses an Instagram-level of hashtags on a Facebook post? Or when someone tags somebody else and the tagged person’s username is different on different platforms? Not pretty—or professional. Every network has a different set of required specs for content, so if you’re posting an Instagram image to Twitter the quality might be poor. Not only that, but, as we explain in our post Stop Posting the Same Message on Social Media (And Do This Instead), “things like caption length, image formatting, and vocabulary differ by platform. Sharing the exact same post on all of them means you might accidentally end up inviting your followers to retweet you on Facebook, or Pin your post on Instagram.” How embarrassing. It’s also important to make sure you aren’t boring your audience. “You want to do anything to avoid audience fatigue,” Martin explains. “If you’re posting the same content on all of your channels, you risk audience members seeing the exact same thing from you over and over again.” If you’ve ever experienced this from a brand, you know just how annoying it can be. Instead, think of your campaign as a story you’re telling across different mediums. You want the story to feel connected and cohesive, but not repetitive. Continue reading to find out exactly how to do this. Tips for running your campaign on 4 key networksOur social media team has found that each network is best suited for a specific type of content. They share their experiences and insights—along with issues particular to each network—below.
Once you know who your audience is, it becomes much easier to create content that will resonate with them. For Facebook, our team has found that Facebook users want more storytelling content instead of being continuously served ads.So it’s important to find creative ways to intrigue our audience. “When it comes to Facebook, our audience wants a story. We can’t simply post something like a stat. It needs to be creative and visual,” Colling explains. “Because of this, we have found that video performs really well on Facebook.” Facebook is especially useful when it comes to the overall brand awareness aspect of your campaign. “Facebook allows you to lean on your brand to peak users’ interest,” Wood explains. “It’s a great network for educating and inspiring your following in order for them to take action. Through this, you’re able to build a lasting relationship with your audience and customers.” Takeaway: when designing your campaign, consider using Facebook for storytelling and education focused posts that contribute to brand awareness objectives, particularly in video form. Before you share your campaign on Instagram, you need to think about whether it fits into your overall strategy. Our Hootsuite Instagram feed features user-generated-content and lifestyle content, so sharing a campaign post wouldn’t align with our strategy. However, we have found great success sharing our campaigns to Instagram Stories and IGTV. It’s all about finding what works best for your brand. “It’s also crucial to understand that it’s likely your audience is viewing your Instagram content on mobile,” Wood explains. “Make sure your campaign content is mobile-friendly and doesn’t require multiple steps or complicated user-interfaces to serve your purpose.” For example, if you’re running an ad on Instagram Stories for an upcoming webinar and your audience has to swipe up to register, make sure there aren’t any barriers such as pop-ups or passwords. You want to do everything you can to ensure they are able to fulfill the action without abandoning your site. Takeaway: In a mobile world, it’s important to simplify the process as much as possible for your audience. The fast-paced and news-focused nature of Twitter means you have to be extra conscious of the campaign content you post there. “Twitter is very value-driven,” Martin explains. “We’ve found that the Twitter audience responds well to very clear CTAs and direct information.” If you’re advertising a campaign webinar, Tweet out the key elements of your message—date, time, topic—and leave any teaser info out. The Twitter timeline is jam-packed with content and distracting visuals, so you want to make sure your message doesn’t get lost in the crowd. Our team has found that social cards (a digital postcard), GIFs, and static images work great for campaigns. Social cards allow your brand to clearly share crucial information in a visually-appealing way, and other images such as GIFs fit in with the way users are interacting with Twitter. Again, it’s about knowing your audience on the platform. If you’ve seen your followers engage with GIFs in a positive way or notice a boost in webinar sign-ups after sharing social cards, you can take this data and apply it to future campaigns on Twitter. Bonus: Get the step-by-step social media strategy guide with pro tips on how to grow your social media presence. Get the free guide right now!Takeaway: Give your audience the key information they need—right away. When it comes to LinkedIn, your audience is looking for very specific content. “LinkedIn users are on the network with the goal of improvement,” Colling explains. “They are looking to advance their careers, get expert advice, and learn new things, so it’s important to create campaign content that speaks to these needs.” Where a video you shared on Facebook might be about brand awareness and feature more storytelling components, you can switch up the video’s main message for your LinkedIn portion of your campaign to show your audience exactly what they’ll learn in your webinar (for example) or why other professionals will be watching the webinar. FOMO is real on LinkedIn, but with some quick changes to your copy and visual assets you can easily create content that resonates with your audience there. Takeaway: Focus on posting educational content that helps your audience improve an aspect of their lives—and be clear about why they shouldn’t miss out. Tracking cross-platform campaignsDetermine your goalsWhen determining metrics for your cross-network campaign, it’s important to have your ultimate goal in mind. Are you trying to get leads? Event sign-ups? General brand awareness? The metrics you measure will depend on your campaign goals. Like content, your metrics could be different according to the networks you’re running your campaign on. While general engagement (likes, comments, etc.) will usually be tracked across platforms, specific metrics such as Swipe Ups for Instagram Stories or Retweets on Twitter should be acknowledged and defined in your strategy. Like many aspects of a cross-platform campaign, metrics are not always a one-size-fits-all solution. Test and adjust as necessaryWhen running a campaign across multiple networks, you have to be extra diligent about metrics and tracking. “A campaign isn’t something you can just set and forget, especially if you have budget behind it,” Martins explains. “We’re constantly checking in on how our campaigns are doing and move budget around if necessary. We’ll often see that a campaign is doing much better on one platform or another due to the type of content, so will shuffle the budget accordingly.” Tracking and measuring success allows you to better plan for your next campaign. “Like most businesses, we have different sets of audiences on our different networks,” Colling explains. “Because of this, it’s important to pay attention to the type of content that resonates with each target audience, and metrics help with this.” Our team recommends testing content with your audience, and cutting out any audience groups that aren’t performing. For example, you may notice that your campaign is really resonating with female executives. If this is the case, it might make sense to stop putting budget towards male students and redirect that budget towards your better-performing audience. By constantly testing different content and tracking the metrics of each platform, you can easily figure out how to make your campaigns more efficient in the future. How to use Hootsuite for cross-platform campaignsHootsuite can help with your cross-platform campaign in multiple ways. When it comes to getting the word out about your campaign, Hootsuite Amplify can be a huge help. Amplify will enable your company’s employees to share your campaign to their own social media community in a way that’s more personal. With 76 percent of consumers trusting information shared by others over content shared by brands, this could make a huge difference for your campaign. You can also use Hootsuite to add UTM tags to your content to track your campaign more easily. With UTM parameters, you can see what content is performing best, measure and prove ROI, and refine your social media strategy overall. Keeping track of your campaign’s moving parts across different networks can be another huge challenge for marketers. Hootsuite Planner allows you to survey all your scheduled and published content, create new posts, and organize existing ones. Find out more about Planner here. Running a cross-platform social media campaign is no easy task, but with the above tips and Hootsuite’s tools you’ll be on your way to success in no time. Make sure to check out this list of examples of top social media campaigns for inspiration, too. Run your cross-platform social media campaign with Hootsuite. Easily compose, schedule, and publish posts to all the major social networks from one dashboard, while tracking results and testing performance. Try it free today. The post How to Run a (Successful) Cross-Platform Social Media Campaign appeared first on Hootsuite Social Media Management. How to Run a (Successful) Cross-Platform Social Media Campaign published first on https://themarketingheaven.tumblr.com/ via Tumblr How to Run a (Successful) Cross-Platform Social Media Campaign Here, we’ve compiled some of the most pivotal “moments” in social media’s history. From the very first social networking site (invented in the 1990s), to recent changes to networks with billions of users. So sit back, relax, and join us while we look back at what once was the future. The 29 most important moments in the history of social media1. The first social media site is born (1997)On one of the first true social media sites, SixDegrees.com, you could set up a profile page, create lists of connections, and send messages within networks. The site amassed around one million users before it was bought out for $125 million …and shuttered in 2000, though it later made a modest comeback and still subsists today. 2. Are you? Hot or Not (2000)Who can forget Hot or Not ( AmIHotorNot.com )—the site that invited users to submit photos of themselves so others could rate their attractiveness. The site is rumored to have influenced the creators of Facebook and YouTube—and nurtured millions of insecurities. After being sold off a few times, its new owners tried to revive it as a “game” in 2014. 3. Friendster (2002)Then along came everyone’s BFF: Friendster. Launched in 2002, Friendster was originally going to be a dating site that would help set up people with friends in common. You could create a profile, include “status updates” and reveal your mood. Messaging “friends of friends of friends” was also a thing. Unfortunately, the site’s spike in popularity in 2003 caught the company by surprise and took a toll on its servers, impacting users, who increasingly looked to connect elsewhere. 4. Myspace: “a place for friends” (2003)In droves, frustrated Friendsters said “sorry it’s not me, it’s you” and pulled up stakes for Myspace , the Friendster rival that quickly became the go-to site for millions of hip teens. Its customizable public profiles (which often featured music, videos and badly shot, half-nude selfies) were visible to anyone, and were a welcome contrast to Friendster’s private profiles which were available only to registered users. 2005 marked the apex of Myspace. The site had 25 million users and was the fifth popular site in the United States when it sold to NewsCorp that year. And that was the start of its decline from ultra-trendy to ultra-tacky. 5. Gaining traction (2003-2005)In 2003, Mark Zuckerberg launched Facemash, described as Harvard University’s answer to Hot or Not. “The Facebook” followed in 2004. Registering its one millionth user that same year, the site dropped the “the” to became just “Facebook” in 2005, after the “Facebook.com” domain was purchased for $200,000. Around the same time, a tidal wave of other social media sites swept ashore: LinkedIn emerged, targeting the business community. Photosharing sites like Photobucket and Flickr, social bookmarking site del.ici.ous and the now ubiquitous blogging platform, WordPress also came into existence. YouTube also launched in 2005. Anyone remember “Me at the zoo”--the very first YouTube video of that man and the weirdly watchable elephants? It now has 56 million views. News-aggregator-cum-snark factory, Reddit arrived that year too. 6. Twitter hatches (2006)Despite its 2004 birth date, 2006 was arguably the year Facebook truly took flight: it opened registration to everyone and went from an exclusive Harvard-only club to a global network. Twttr, the site that eventually became known as Twitter also took flight in 2006. The first tweet ever, posted by co-founder @Jack Dorsey on March 21, 2006, read: “just setting up my twttr.” So glad they changed the name, because “twttr” scks! Dorsey originally envisioned twttr as a text message-based tool for sending updates between friends. Apparently in the early stages of its development the twttr team racked up some steep SMS bills. TechCrunch reported twttr’s first users were sending breaking life updates like: “Cleaning my apartment” and “Hungry”. (My, how times have(n’t) changed!) 7. LinkedIn “in the Black” (2006)In sharp contrast to other networks, LinkedIn—once known as “Myspace for adults”—was the first to offer users paid premium packages. Its Jobs and Subscriptions area, the site’s first premium business line, helped bring in revenue in the early days. In 2006, just three years post-launch (and three years before Facebook!), LinkedIn turned a profit for the first time. “As far as we’re concerned, a year of profitability is but a ‘taste’ of the success we aspire to achieve at LinkedIn,” said social media manager Mario Sundar, in a blog post lauding LinkedIn’s first year “in the black.” The site’s profitability would be a recurring theme in the stampede towards IPO—both LinkedIn, and numerous copycats. 8. YouTube makes partners (2007)Through YouTube’s elephantine beginnings, buzz grew: it gathered nearly eight million daily views between its May 2005 beta its official launch in December 2005. Then, things escalated quickly: ahead of its acquisition by Google in the fall of 2006, the site grew to 100 million videos being watched by 20 million dedicated users. In May 2007, YouTube introduced its partnership program, which has been key for the site. The initiative is what it sounds like: a partnership between YouTube and its popular content creators. YouTube provides the platform and creators provide the content. Profits from advertising on creators’ channels are then shared between the two parties. And that’s how Lonelygirl15 and your favorite YouTubers got their start. 9. Tumblr and the age of the microblog (2007)In 2007 the social network described as “Twitter meets YouTube and WordPress” came a-tumblin’ along. 17-year-old David Karp launched Tumblr from his bedroom in his mother’s New York apartment. The site allowed users to curate pictures, videos and text and “reblog” their friends on their “tumblelogs.” Soon after, the term micro-blogging became widely used to describe both Twitter and Tumblr, which both allowed users to “exchange small elements of content such as short sentences, individual images, or video links.” 10. The hashtag arrives (2007)The strict 140-character limit for tweets set Twitter apart from rivals, including Facebook and Tumblr. But Twitter’s significance in the digital age was really defined by the hashtag, a symbol that has helped political organizers and average citizens mobilize, promote, and create awareness for critical (and not so critical) social issues. Hashtags have also helped plant the seeds that sprouted movements such as #Occupy, #BlackLivesMatter, and #MeToo. Also, timesucks like #SundayFunday, #YOLO and #Susanalbumparty. As the story goes, during the summer of 2007, one of Twitter’s early adopters, Chris Messina, proposed the hashtag (inspired from his early days on internet relay chats) for organizing tweets. It wasn’t until a couple of months later, that the #SanDiegoFire hashtag was sparked to aggregate tweets and updates about the California wildfires. Still, Twitter didn’t fully embrace the hashtag until 2009, realizing that it was more than just a useful way to group content, but a unique vernacular for expressing ideas and emotions online too. It invigorated the platform, and brought new users. 11. Welcome Weibo (2009)While we’re on the topic of micro-blogging, we would be remiss not to mention China’s Sina Weibo, or simply Weibo. A Facebook and Twitter hybrid, the site launched in 2009—the same year Facebook and Twitter were banned in the country. Along with Qzone and QQ, Weibo remains one of the most popular social networks in China, with 340 million active monthly users. 12. Back to the land with FarmVille (2009)Back over on the other side of the ocean, 2009 was the year your mom, granddad and Aunt Jenny joined Facebook and couldn’t (or wouldn’t) stop inviting you to join the new family pastime, FarmVille. Like you didn’t have enough chores to do IRL, wiling the day away on virtual animal husbandry added to the list. The addictive social game eventually made TIME magazine’s list of the world’s worst inventions. (Of course, that didn’t stop Zynga from creating spinoffs like PetVille, FishVille and FarmVille 2 among others. PassVille.) 13. When your FourSquare “check in” ousted your FarmVille update (2009)2009 also showed users how to acquire important-sounding-yet-meaningless titles from their daily travels. Location-based app Foursquare was one of the first that allowed users to “check in,” while sharing recommendations all about their favourite neighbourhoods and cities with friends and family …and earn virtual mayorships while they were at it. 14. Grindr revolutionizes the hookup (2009)Tinder comes to mind as the app that changed online dating culture when it appeared in 2012. But Grindr, on the scene in 2009, was the first geosocial networking app for dating geared towards gay and bisexual men, helping them meet other men nearby. For better or worse, it revolutionized hookup culture for gay men, and paved the way for many others like Scruff, Jack’d, Hornet, Chappy, and Growlr (for bears). 15. Unicode adopts the emoji (2010)There can be little doubt that digital culture changed in 1999 when the emoji first appeared on Japanese mobile photos, thanks to Shigetaka Kurita. Their popularity quickly ???? (uh, took off). By the mid-2000s, emoji started appearing internationally on Apple and Google platforms. Realizing writing online without access to a thumbs up emoji was nearly impossible, Unicode adopted the emoji in 2010. The move was the beginning of emojis being legitimized as a language. So essential was the “Face with Tears” (a.k.a. the laugh-cry emoji) that it was actually adopted as a word by the Oxford Dictionary in 2015. And each country has their own favorite: for Americans it’s skulls, Canadians love the smiling pile of poo (WTF, Canada?), and for the French? Of course it’s the heart. 16. Introducing Instagram (2010)Can you remember the pre-filter days of photo-sharing—back when there wasn’t the option to add the Gingham filter to make everything look “vintage”? We have Instagram’s founders to thank for our inability to go a day without posting a filtered pic with polaroid corners to our highly curated feeds. On July 16, 2010, one of the first Instagram photos to be published by co-founder Mike Krieger (@mikeyk) was an uncaptioned, heavily filtered shot of a marina. View this post on Instagram The shot definitely set the tone for the billion users around the globe the today post upwards of 95 million shots a day (according to 2016 figures). 17. Pinterest has us pining to pin (2010)Though it first went live in closed beta in 2010, it wasn’t until 2011 that “pinning” would become a favourite new hobby (and verb) for domestic gods and goddesses. Social bookmarking site Pinterest was once called “digital crack for women” and gave women’s lifestyle magazines and blogs a new raison d’etre. A 2012 report about the site found that home, arts and crafts, and fashion were the most popular categories on Pinterest. That’s still true in 2018. Recent stats show two million people post pins every day, and there are one billion pins living on the site! 18. #Jan25 Tahrir Square uprising (2011)Jan. 25, 2011 was a fateful day for hundreds of thousands of Egyptians who took to the streets, gathering in Cairo’s Tahrir Square to protest 30 years of dictatorship under Hosni Mubarak. The uprising eventually forced Mubarak to step down—just as similar protests had ousted Tunisian dictator Zine El Abidine Ben Ali days earlier. Similar actions, which came collectively to be known as the “Arab Spring,” swept countries across the Middle East and North Africa, and were credited with bringing down governments and bringing about positive change for local populations. Reports found that social media networks were critical tools for organizers in mobilizing, publicizing and shaping opinion. Popular hashtags on Twitter (#Egypt, #Jan25, #Libya, #Bahrain and #protest) were tweeted millions of times during the first three months of 2011. Facebook usage grew across the region, doubling in some countries. Government attempts to block access to Facebook and Twitter were briefly successful, but quickly spurred activists to find other creative ways to organize, inspiring onlookers the world over. 19. Snapchat’s disappearing act (2011)Launching almost exactly a year after Instagram, soon-to-be rival “Picaboo” launched …and then quickly rebranded to Snapchat following a lawsuit by a photobook company with the same name. (Probably for the best.) The app’s early success tapped into the ephemeral nature of life’s moments, allowing users to post content that would vanish after 24 hours. (Not to mention giving us all the ability to puke rainbows.) The disappearing snaps appealed to the teen demographic the app first attracted. Snapchat was also the perfect alternative for teens to find their friends—and flee family on Facebook. 20. Google Plus wants in on the party (2011)2011 was also the year Google attempted to roll out another answer to Facebook and Twitter—following previous failed attempts like Google Buzz and Orkut. Google+ or Google Plus began with an invitation-only system in 2011. That summer, new users got access to 150 invitations they could send out before the site’s official opening in September. Demand was so high that Google eventually had to suspend them. Google Plus differentiated itself from Facebook with its “circles” for organizing friends and acquaintances that could be done easily without having to send a friend request. By the end of 2011, Google Plus was fully integrated into related services like Gmail and Google Hangout. Unfortunately, timing of the social network’s launch following Facebook and Twitter meant that the social network struggled to accrue the staggering usage numbers its competitors had. (Clearly there are some parties you just don’t want to be late to.) 21. Facebook celebrates one billion (2012)Just eight years after launching in Mark Zuckerberg’s Harvard dorm room, Facebook announced its user base had reached a significant milestone—and now shared a population nearly the size of India. “If you’re reading this: thank you for giving me and my little team the honor of serving you. Helping a billion people connect is amazing, humbling and by far the thing I am most proud of in my life,” Zuckerberg said. Looking back, now that Facebook has two billion users and three other billion-user platforms—WhatsApp, Messenger, and Instagram—his quote sounds all the more quaint. 22. Year of the selfie (2014)Twitter proclaimed 2014 as the “Year of the Selfie” following Ellen DeGeneres’s Oscar photo. You know the one. Or, you should. Because that selfie has been retweeted more than three million times—setting a Twitter record and winning Twitter’s award for “Golden tweet” of the year.
The debate about who invented the selfie has yet to be resolved. Paris Hilton said she did in 2006. Others say it was actually a guy named Robert Cornelius in 1839. (He wasn’t available for comment.) 23. Meerkat, Periscope: the streaming wars begin (2015)Meerkat was the first app to start the live streaming craze (RIP). Then, Twitter developed Periscope and won the first streaming wars (there’s another one coming, I’m sure). Periscope became everyone’s favorite, easy-to-use app for streaming and watching live events. Getting showered with “hearts” anytime you hit the record button was pretty much all the incentive anyone needed to try it out. It was so popular that Apple awarded the app the iOS app of the year in 2015. Three years on, the video app is rumoured to be struggling. But it’s also integrated with the Twitter mobile app, so there are still ways to become a Periscope celeb. 24. Facebook LIVE (2016)Facebook was slow to slide into the live stream game, first rolling out live streaming features on its platform in 2016. But the company has worked to ensure its success in the space with extra resources and partnerships with mainstream media like Buzzfeed, the Guardian and the New York Times. Special attention from Zuckerberg and its massive user base have also ensured its dominance. 25. Instagram launches Stories (2016)Taking a page from Snapchat’s playbook, Instagram introduced “Stories” allowing users to post photo and video sequences that disappear within 24 hours (although they can now be saved and archived). Filters, stickers, polls, hashtags, and highlights to enhance Stories have succeeded in making the app even more addictive, as if that was even possible. 26. The U.S. election and social media’s fake news crisis (2016)You could argue that 2016 was a no good very bad year for social media—and by extension democracy. It was the year a sophisticated information warfare was waged using “troll factories” on social media used to spread disinformation—including false claims and conspiracy theories—during the U.S. presidential election. Mainstream influencers like journalists, pundits and politicians—even Hillary Clinton and Donald Trump—were found to be spreading content that bots had shared online. Facebook has since revealed that 126 million Americans were exposed to content by Russian agents during the election. In 2018, Facebook, Twitter, and Google representatives appeared before the U.S. Congress to testify as part of ongoing investigations into Russia’s attempts to influence the elections. 27. Twitter doubles the character limit (2017)In an effort to attract more users, Twitter doubled its signature character limit from 140 to 280 characters. The move was widely panned by more than a few users (and had critics hoping Trump wouldn’t find out). Of course, it was @Jack who tweeted out the first super-sized tweet:
The major change along with the introduction of “threads” (aka Twitterstorms) now means tweets that will make you go WTF are increasingly unavoidable as everyone makes the most of their 280 characters. 28. Cambridge Analytica and #DeleteFacebook (2018)In early 2018, it was revealed that Facebook allowed a researcher from Cambridge Analytica—who had worked on Donald Trump’s presidential campaign--to harvest data from 50 million users without their consent. A campaign to #DeleteFacebook swept the internet as users protested by deleting their profiles on the site en masse. Despite this, Facebook’s user numbers continue to climb. Facing mounting pressure to address data privacy, Zuckerberg participated in five days of hearings before the U.S. Congress. 29. Instagram launches IGTV app (2018)If you thought Boomerang was the only video app Instagram had up its sleeve you would be wrong. Instagram is now ready to compete with YouTube: the company increased its one-minute video limit to one-hour and launched a whole new app, IGTV, dedicated to long-form video. Up next 2019Hear our 2019 social media predictions in our data-pack Social Trends Webinar. Gain new insights from our survey of 3,255+ of social media professionals and leave with cutting-edge best practices from the world’s brightest social brands. The post The History of Social Media: 29+ Key Moments appeared first on Hootsuite Social Media Management. The History of Social Media: 29+ Key Moments published first on https://themarketingheaven.tumblr.com/ via Tumblr The History of Social Media: 29+ Key Moments A well-crafted buyer persona (or customer persona, audience persona, or marketing persona) allows you to personalize your marketing on a large scale by humanizing core target groups of your customer base. From crafting the right message for the right consumers to targeting your social ads effectively, personalization is simply a must in the social media world. Even more important, personalized marketing is something your customers expect. An April 2018 survey found that more than half of consumers expect companies’ offers to always be personalized. More than two-thirds of millennials feel that way. However, two-thirds of marketers find personalization difficult to execute. But there’s no need to throw in the towel on this effective strategy. Continue reading to find out how to craft and use buyer personas in your social media marketing. Bonus: Get a free buyer persona templatethat helps you craft a detailed profile of your ideal customer. What is a buyer persona?A buyer persona is a model that describes your typical or target customer, based on detailed audience research. The idea is to create a profile of your ideal customer as if he or she were a real person, so you can craft targeted marketing messages to them. These messages should use the right tone of voice and address the specific needs and desires of your customer. Since different groups of people may buy your products for different reasons, you will probably need to create more than one buyer persona. Each persona should include basic demographic details, behaviors, goals, pain points, and buying patterns. You can’t get to know every customer or prospect individually. But you can create a customer persona to represent each general segment of your customer base. This makes it much easier to think of your customers as real people and to consider their wants and needs as you craft your marketing strategy. How your business should use buyer or audience personasMarketing personas allow you to craft effective, targeted messages that speak directly to each customer group. In your personal life, you share important messages differently depending on who you want to reach. Say you have interesting news to share with your parents, friends, and coworkers. You would probably use different words and tools to reach each of these groups. You might call your mom on the phone, post on Workplace to alert your colleagues, or use a WhatsApp group chat to share with your friends. Understanding your buyer personas allows you to understand the best ways to reach each of your different customer groups, just as you intuitively know how to best reach and speak to different groups of people in your personal life. Your marketing personas can also become company-wide shorthand for evaluating business decisions. Does a new product feature better meet the needs of your buyer personas? If not, you have good reason to reconsider your plan, no matter how exciting it is to your marketing team, or your IT department, or even your CEO. How to create buyer personas in 5 simple stepsIn order to be useful, your buyer personas need to be based on real-world information, not gut instinct. Define the people who actually want to buy from you, not the people you wish would buy from you. That means you need to start with some in-depth research. Gather the information as you work through these steps. Use it to fill in the buyer persona template when you get to step five. 1. Do thorough audience researchHere’s a basic primer on learning details about your audience. For a more in-depth look at these concepts, check out our complete guide to audience research.
2. Identify customer pain pointsWhat problems or hassles are your potential customers trying to solve? What’s holding them back from success? What barriers do they face in reaching their goals? One key way to find out is to engage in some social listening and social media sentiment analysis. Setting up search streams to monitor mentions of your brand, products, and competitors gives you a real time look into what people are saying about you online. You can learn why they love your products, or which parts of the customer experience are just not working. It’s also a good idea to check in with your customer service team to see what kinds of questions they get the most. Find out if they can help you identify patterns about which groups tend to face different kinds of challenges. You could even ask them to collect real customer quotes that you can use to help give your audience personas depth. 3. Identify customer goalsThis is the flip side of pain points. While pain points are problems your potential customers are trying to solve, goals or aspirations are positive things they want to achieve. Those goals might be personal or professional, depending on the kinds of products and services you sell. What motivates your customers? What’s their end game? These goals might be directly related to solutions you can provide, but they don’t have to be. This is more about getting to know your customers than it is trying to match customers exactly to features or benefits of your product. Even if your personas’ goals don’t relate specifically to your product’s features, they can form the basis of a campaign, or they might simply inform the tone or approach you take in your marketing. Social listening can be a good way to gather this information, too. And just as your customer service team was a good source of insight for pain points, your sales team can be a good source of insight on customer goals. Your salespeople talk to real people who are thinking about using your product, and they have deep understanding of what your customers are trying to achieve by using your products and services. Ask them to collect real quotes that embody the customer experience. You can also ask them for any key strategies they use to overcome buyer objections when selling your products or services, which leads us to… Bonus: Get a free buyer persona templatethat helps you craft a detailed profile of your ideal customer. Get the free template now!4. Understand how your brand can helpNow that you understand your customers’ pain points and goals, it’s time to create a really clear picture of how your products and service can help. As part of this step, you’ll need to stop thinking about your brand in terms of features and dig deep to analyze the benefits you offer to customers. It can be hard for marketers to get out of the feature mindset—which is one reason buyer personas are so important. They help you flip your thinking and consider your products and services from a buyer’s point of view. Remember: A feature is what your product is or does. A benefit is how your product or service makes your customer’s life easier or better. Ask yourself one question for each of the pain points and goals you’ve collected: How can we help? The answers to this question will provide the basis for the key marketing messages you’ll craft in the next step. 5. Turn your research into buyer personasGather all of your research and start looking for common characteristics. As you group those characteristics together, you’ll have the basis of your unique customer personas. Here’s how this looks in practice. Let’s say you identify a core customer group of women in their 30s who live in big cities, like to run, and own small dogs. Great—now it’s time to take this abstract collection of characteristics and turn them into a persona that you can identify with and speak to. Give your buyer persona a name, a job title, a home, and other defining characteristics. You want your persona to seem like a real person without getting too specific and excluding characteristics that should rightly be considered part of this customer group. Aim for about the amount of information you would expect to see on a dating site, or what you might learn from a short conversation on an airplane or at a bus stop. Don’t forget to include pain points and goals. For example, your group of dog-owning urban women runners could be represented by the persona you name Jogging Jane. Rather than speaking generally about city living and dog ownership, you’ll give Jane representative characteristics that make her a real person:
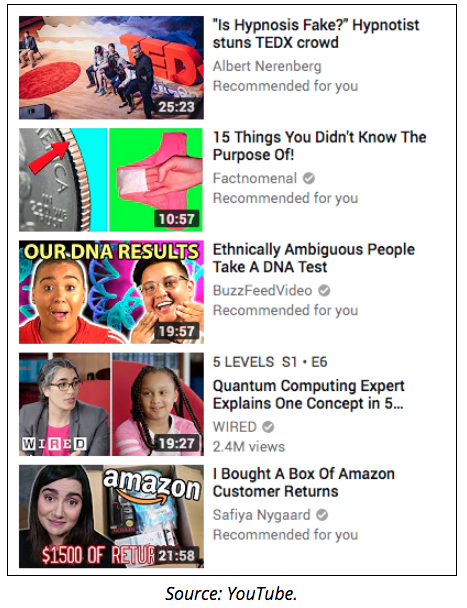
And so on. Remember, a list of characteristics does not equal a persona. A persona is realistic description of a person who represents one segment of your customer base. Sure, not all people in this customer group match the characteristics of your persona exactly. But this persona represents this customer group to you and allows you to think about them in a human way rather than as a collection of data points. It’s a lot easier to speak to Jane than it is to speak to “women.” Or even “35-year-old women who own dogs.” As you flesh out your buyer personas, be sure to describe both who each persona is now and who they want to be. This allows you to start thinking about how your products and services can help them get to that place of ambition. How to use personas to guide your marketingThinking of your buyer personas as real people allows you to craft marketing messages that speak to real people. Marketers too often fall into using corporate-speak that incorporates a lot of buzzwords but doesn’t really mean anything. It’s harder to fall into that trap when you’re crafting a marketing message specifically for Jogging Jane. What questions does she have that your marketing message can answer? What social networks does she use? What kind of language does she use when she interacts with her friends online? Thinking of Jane as a real person makes sure you address her priorities instead of your own. This is where your answers to the “how can we help” exercise come in. For each buyer persona, create one key marketing message that answers this question. How does your brand help this specific persona solve their problems and achieve their goals? Capture that in one clear sentence and add it to your persona template. Think about your buyer personas every time you make a decision about your business and your marketing strategy. Do right by those personas and you’ll build a bond with the real customers they represent, boosting sales while creating brand loyalty and trust. Research and engage your target audience on social media with Hootsuite. Besides digging into audience demographics, you can compose, schedule, and publish the messages you’ve crafted specifically for your ideal customer . Try it free today. The post How to Build a Buyer Persona (Includes Free Template) appeared first on Hootsuite Social Media Management. How to Build a Buyer Persona (Includes Free Template) published first on https://themarketingheaven.tumblr.com/ via Tumblr How to Build a Buyer Persona (Includes Free Template) Real talk: if you’re hatching plans to begin marketing on YouTube this year, you need to be savvy about it. YouTube has more than 50 million content creators churning out videos regularly, so your own content has to stand out. Another challenge? Reaching and engaging your core audience. The majority of YouTube viewers aren’t huge fans of advertising, so you’ll have to think carefully about how you’re going to raise awareness about your brand while keeping viewers entertained. This might sound intimidating, but with the right approach, it’s totally doable. By the time you’ve finished this 10-step guide to marketing on YouTube, you’ll have a good grasp of how to get started. We’ll be focusing on three key areas:
Now, let’s jump in! Bonus: Download a free guide that reveals the exact steps one entrepreneur took to gain more than 23,000,000 views on YouTube with no budget and no expensive gear. 10-step YouTube marketing strategyStep 1. Create a YouTube channel for businessBefore you do anything, open a Brand Account on Google. When you create your YouTube channel using a regular Google account, only one person—the Google Account holder—can log into that channel. By creating your YouTube channel using a Brand Account, multiple authorized Google Accounts can log in simultaneously. YouTube channels have a lot of moving parts, so you’ll want at least one or two other people helping run the show. Check out our step-by-step guide to creating a YouTube for business account for detailed instructions on how to do this. Step 2. Learn about your audienceYour YouTube channel for business gives you access to the Analytics tab, which contains a ton of stats related to your channel. Look here for quantitative insights on your channel and your audience’s behavior, including your view counts, average watch time, revenues generated, and interaction rate across videos. The Analytics tab also contains valuable data on your subscriber demographics. Even if you think you know who your subscribers are, pay close attention to what you find under the Demographics tab. This data will help you move beyond assumptions and feel confident that you’re reaching the right audience. Monitor the Watch Time and Demographics analytics to answer questions like:
Tracking audience analytics is a win-win. If your assumptions about your subscribers are confirmed, that’s great: you’re now certain you’re reaching the right audience. If your assumptions were incorrect, you know to adjust your content strategy to reach the audience you want. On the other hand, you may learn that your product is resonating with an unexpected demographic—valuable info for your entire marketing team. Beyond quantitative metrics, you can also gain qualitative information—the whys and the hows—about your audience by reading and managing the comments on your videos. Reading the comments isn’t always fun, but the information you find here will be invaluable for informing different aspects of your marketing strategy, both on and off YouTube.
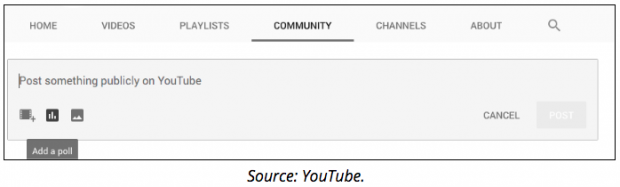
Hot tip: the YouTube Community Page is an underrated space for finding out about your audience. Located under the Community tab on your profile, you can interact with your subscribers directly. Post questions or create a poll to gain a deeper understanding of how your audience thinks. Step 3. Research your competitionCompetitive analysis is essential if you want to pull ahead of other businesses in your niche on YouTube. Fortunately, a lot of the information you need to identify potential opportunities is readily available on their channels. Browse your competitors’ YouTube channels and take note of which videos got the most and least views. Watch these videos get a sense of what kinds of content your audience likes to watch (and what they don’t) and use that to inform your own content strategy. As with your own videos, roll up your sleeves and read the comments on competing videos. Maybe your own brand has received a mention; if so, make sure to respond so potential customers can see you’re actively engaging with your community.
Read competing video descriptions to see what keywords they’re using in their YouTube search optimization. Use similar ones to boost your ranking in YouTube’s search pages and recommended video feeds. One final note: make sure your competitors aren’t serving ads on your videos! If they are, it’s possible to block them in Google’s ad manager. More on that here. Step 4. Learn from your favorite channelsWhen you’re watching YouTube on your own time, ask yourself: What about this video holds my attention? What keeps me coming back to my top channels? Paying attention to your favorite YouTubers will reveal the techniques and best practices they follow to drive views, subscriptions, and engagement. Even if they’re not technically within your business niche, it’s possible that you can adapt your favourite YouTubers’ strategies to increase your own YouTube following. Don’t be afraid to try out some of the weirder trends, either: it worked for these brands. Besides being a huge source of of inspiration for your own viral videos, it’s also worth remembering that YouTube is an incredible resource for self-starting learners. There are hundreds of YouTube channels that will straight-up tell you how to be a successful marketer, no guesswork required. We put together a list of the best YouTube channels to help you up your digital marketing game. Step 5. Optimize your videos for SEO to get viewsYour YouTube videos need to be optimized for search if you want to get the most value out of them. But don’t worry if your first few videos fail to gain a lot of traction. You can work on tweaking and perfecting your YouTube SEO over time. We’ve written a detailed guide to getting more views on YouTube, but here are some tips to get started: Pick the right title (with the right keywords)The first step to optimizing a YouTube video is to pick an appealing title containing relevant keywords (I like to use Google Adwords Keyword Planner for this). Make sure the title is relevant to the video topic: nobody likes clickbait. If you can, try to include exact keywords matching common search terms: it will get you more clicks. YouTube video titles can contain up to 70 characters; we recommend 60 or fewer so nothing’s cut off on the search pages. Make sure the title is relevant to the video topic: nobody likes clickbait. If you can, try to include exact keywords matching common search terms: it will get you more clicks. YouTube video titles can contain up to 70 characters; we recommend 60 or fewer so nothing’s cut off on the search pages. Make an interesting thumbnailWhen you upload a video you can choose a freeze-frame to use as the thumbnail. However, we strongly recommend making your own custom thumbnail, as it’ll help your content stand out.
Write a compelling video descriptionYour video description should contain a short explanation of your video topic, as well as links to your website and social media accounts, and a list of hashtags (more on those in a minute). YouTube’s got a whole tutorial on writing helpful video descriptions. Here’s a summary of the most important points:
Add hashtags to your video descriptionHashtags make your content more searchable on YouTube. Pick a small number of hyper-relevant hashtags rather than an exhaustive list. If you use more than 15 hashtags, all hashtags on that video will be ignored anyway, so be selective. Oh, and remember to follow YouTube’s hashtagging rules. Add cards, bumper ads, and watermarks to promote your channelCards, bumper ads, and watermarks are clickable CTAs you can add to your YouTube videos. These are effective because they’re relatively unobtrusive, offering minimal disruptions to the viewing experience. You can read all about them in Hootsuite’s guide to YouTube advertising, but here’s a quick rundown:
Ask viewers to subscribeSometimes, the easiest way to get what you want is to ask for it. There’s a reason every YouTuber ends their videos with a verbal call to “Like, share, and subscribe”—it works, and takes zero effort. Step 6. Upload and schedule your videosOnce you’ve created a few well-optimized videos, it’s time to put them into rotation. So what’s the best way to schedule your YouTube videos? As a platform, YouTube’s almost as popular as television. And many of your subscribers will treat your YouTube channel like a TV station—so you should run it like one! Be professional and share content on a regular schedule. If you promise your subscribers they’re getting a new video every Saturday at noon eastern, you have to commit to that, or risk losing their trust (and their views). TV studios offer a useful model for content creation, too. Make sure you’ve got several “episodes” of content ready to schedule ahead of time. Besides giving you a Plan B if your video creation schedule is disrupted, creating multiple episodes in advance generally means your videos will be more consistent in quality. You can upload and schedule your YouTube videos in advance from the Creator Studio, or with a tool like Hootsuite, which allows you to cross-promote your video releases with posts on other social channels all from the same dashboard. Read more about how to schedule YouTube videos. Step 7. Optimize your channel to attract followersAfter you’ve optimized your videos, you’ll need to optimize your YouTube channel itself. By providing a consistent experience across your channel, you’ll be able to bring in more views, and more importantly, convert those views into regular subscribers.
Fill out your YouTube profileThis is an easy place to start. Fill out as many relevant details on your profile as possible, including:
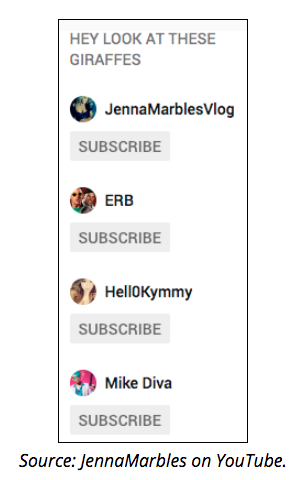
You can also add a list of Featured channels to your YouTube profile. Your list of featured channels gives your subscribers easy access to other YouTube resources they might be interested in, adding value to your page. This might sound like you’re giving free advertising to your competitors, but you can actually benefit from doing this, too.
Remember, YouTube is a community. Networking with different channels will help you forge relationships with other creators in your space, providing you with opportunities for cross-channel promotions or other collaborations in the future. When you make friends on YouTube, everybody wins! Organize your videos into playlistsWhen your YouTube videos are organized into playlists, they’ll autoplay until the playlist ends, keeping viewers on your channel for longer, increasing that important average watch time statistic on your channel. You can build playlists on YouTube, or you can manage them using Hootsuite. Curate your playlists thoughtfully. Make sure there’s a logical progression of ideas from one video to the next. This will reduce the likelihood of people clicking away to another channel. You can build playlists entirely using your own videos, or include partner videos. Similarly, if you’ve started networking with other YouTubers, see if you can persuade them to add your videos to their playlists. Remember to include relevant keywords in your playlist titles to boost your YouTube SEO! Translate your videos into different languages
According to YouTube, more than 60% of a YouTube channel’s views originate outside the creator’s own country. Expand your reach by adding subtitles to your YouTube videos. If that sounds expensive, don’t worry: you can actually crowdsource free translations from your fanbase! To do this, you’ll need to turn on community contributions for videos:
This feature is also available on a per-video basis, which you might want to start with if you’re trying it out for the first time. Approving the translations is simple. YouTube’s interface shows a Google-translated approximation of the translated text so you can ensure the translation is on-topic and makes sense. Crowdsourced content isn’t foolproof and won’t always offer the best quality, but it’s a good starting point for internationalizing your channel. Step 8. Try YouTube advertisingYour YouTube channel isn’t the only place people can see your content—if you’ve got the funds, you can also pay for YouTube advertising.
For more info on YouTube’s ad formats and how to use them, check out our detailed guide to YouTube advertising. With YouTube advertising, the key is to produce relevant, engaging content that makes viewers forget they’re watching an ad. Generally, that means keeping things short, entertaining, and hyper-targeted. Step 9. Try working with an influencerOne of the best ways to showcase your products on YouTube is by working with an influencer. According to Google, 60 percent of YouTube subscribers trust the opinions of their favorite influencers. Tapping into an influencer’s tuned-in audience can result in huge returns: just look at Warby Parker, whose partnerships with YouTube and Instagram influencers grew their brand significantly. They are now worth $2 billion. Reach out to influencers who already know and trust your brand. Most YouTube fans are savvy enough to recognize a paid partnership, but if the influencer is honest and upfront about their love of the brand, the “sponsored” aspect won’t matter. When it comes to these partnerships, let the influencer do the talking. The more control you try to exert over the partnership, the more you’ll impact the influencer’s brand, making the whole effort less genuine—and their followers will see it from a mile away. Step 10. Analyze and adaptSo, you’ve built up your YouTube channel, you’re publishing content regularly, and forging partnerships with influencers and other creators in your field. Congratulations—but you’re not done yet! Maintaining and growing your YouTube channel requires constant monitoring. Whenever you publish a new video, check YouTube Analytics for:
I said this before, and I’ll say it again: read the comments! This is the best way to learn exactly what your audience thinks of videos, and your channel as a whole. You might even find concrete suggestions about which video you should make next! 7 tips for creating highly viewable YouTube videosBefore I sign off here, I wanted to provide a quick rundown of ways you can create videos that keep people coming back for more. Unfortunately there’s no way to predict whether a video’s going to go viral--most social video marketers don’t bet on virality anyway—but you can still optimize your content to maximize views and shares. 1. Follow YouTube’s video specificationsStart by uploading video footage that’s optimized for YouTube. Fortunately, the platform has a range of video specifications to suit a variety of needs. We break them down in our article on social media video specs, but here’s a quick refresher: Recommended sizes: 426 by 240 pixels (240p), 640 by 360 pixels (360p), 854 by 480 pixels (480p), 1280 by 720 pixels (720p), 1920 by 1080 pixels (1080p), 2560 by 1440 pixels (1440p) and 3840 by 2160 pixels (2160p) 2. Invest in some good recording equipmentThis tip is quite literal: if you’re producing original content, shoot your videos in HD, and invest in a good quality microphone. Your content will look and feel much more professional. 3. Grab attention earlyThe first 15 seconds of your video are crucial for grabbing attention: this fact is so well-established that YouTube has a whole tutorial on it! Here’s a quick rundown of the best tips:
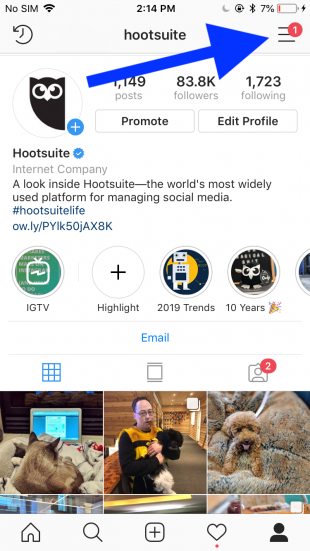
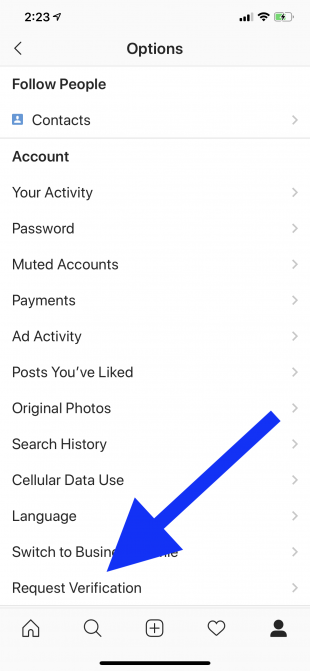
4. Keep mobile in mindMobile playback accounts for more than half of videos watched on YouTube, so it’s crucial to record content that’s optimized for this format. One of the best ways you can do this is to make videos that work with or without audio--85 percent of YouTube videos are watched without sound! Another way to optimize for mobile is to record short videos (three minutes or less). These don’t use as much data and can be enjoyed more easily on-the-go. This isn’t to say mobile users don’t enjoy longer videos too—the average mobile viewing session is over an hour! 5. Film longer videosThis is a matter of simple math: longer videos = more watch time, which is better for YouTube SEO. You can also pack more value into a longer video, provided it’s well-paced and well-scripted. See how some brands, like AirBnb and Hyundai, are pivoting to long-form video. 6. Schedule live-streaming eventsLive streams are a great way to reward your most loyal subscribers. Advertise the event ahead of time and use your YouTube Live to interact directly with your audience. You could even use live streams to gather feedback on your regular videos. Get some other ideas for live video content. 7. Add end screensEnd screens are essential for expanding your viewership. Add calls-to-action to visit other videos or playlists on your channel, subscribe, or direct viewers to your website. Check out this article for information on adding end screens (as well as further Youtube growth hacking tips!). With Hootsuite, you can easily upload, schedule, and promote your YouTube marketing videos across multiple social networks from one dashboard. Try it free today. The post The Complete Guide to YouTube Marketing in 2019 appeared first on Hootsuite Social Media Management. The Complete Guide to YouTube Marketing in 2019 published first on https://themarketingheaven.tumblr.com/ via Tumblr The Complete Guide to YouTube Marketing in 2019 If you want to know how to get verified on Instagram, you’ve come to the right place. In this guide we’ll tell you how to apply for verification (that’s the easy part) and what you need to qualify (that’s the hard part). Bonus: Download a free checklist that reveals the exact steps an adventure photographer used to grow from 0 to 110,000 followers on Instagram with no budget and no expensive gear. How to get verified on InstagramApplying only takes a few moments. Step 1: Open the Instagram app and go to your profile. Step 2: Tap the menu icon in the upper right-hand corner.
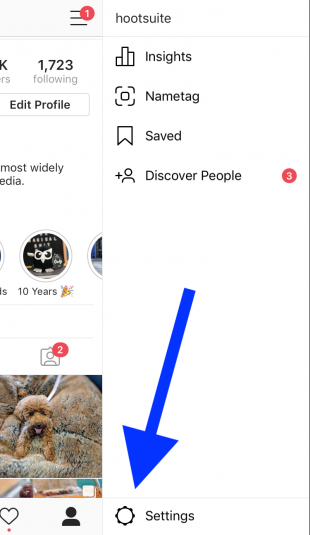
Step 3: Click the “Settings” gear icon at the bottom of your screen.
Step 4: Scroll down and tap “Request Verification.”
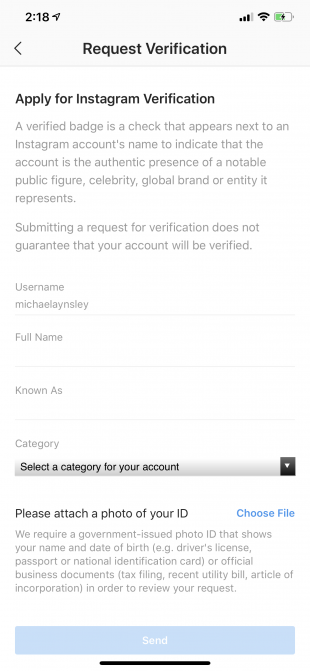
Step 5: Fill in your account name, full name, what you’re “Known As,” and your category (media, influencer, brand, etc.). Then upload a photo of your ID if you’re a person, or a legal or business ID if you have an Instagram for Business account.
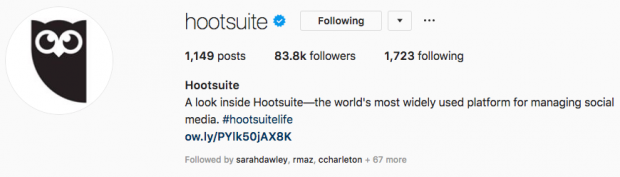
Step 6: Hit “Send” Simple enough, right? After reviewing your application, you’ll be notified whether your request is approved or denied. But don’t expect a response right away. There’s not a specified timeline for how long the process takes. So, should you apply? Let’s answer some frequently asked questions. “Is Instagram verification really all that great?”A verified badge is a check that appears next to your account name. It tells people that your profile is the “authentic presence of a notable public figure, celebrity, or global brand.” The blue check also helps people avoid imposter accounts and easily find the brands or public figures they want to follow.
“Will my application be approved?”The coveted blue check wouldn’t be coveted if it was easy to attain. The good news is Instagram isn’t cagey about what requirements are needed to get it. “Okay, so what do I need to be verified by Instagram?”Verification is reserved for accounts that Instagram deems “in the public interest.” More specifically, you must be a public figure, celebrity or global brand. And you have to follow the network’s Terms of Service and Community Guidelines. And then, Instagram explains on its website, your account must also be:
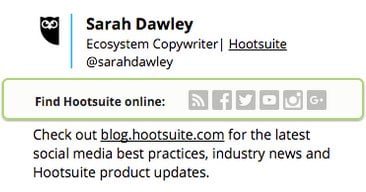
Bonus: Download a free checklist that reveals the exact steps an adventure photographer used to grow from 0 to 110,000 followers on Instagram with no budget and no expensive gear. Get the free checklist right now!“What if I can’t get verified by Instagram?”If you can’t get verified, there are other ways to convey the authenticity of your Instagram account—and boost your chances down the road. 1. Promote your Instagram account on your website and other social profilesNot only will this help more people find you on Instagram, it will clear up any confusion about which accounts are your official ones. So include a link to your Instagram profile on your other social media channels, website, and any other online profile you maintain. 2. Share your Instagram account in other communicationsYou could also include your Instagram handle in your email signature or newsletter. This will ensure that people who are already in contact with your brand can find you on Instagram.
You should also embed your Instagram content in blog posts. That way people that discover your blog via a search engine can connect with you on the ‘gram. View this post on Instagram And don’t rule out offline communications tools like product packaging, business cards, or signage at an event or store. 3. Maintain a consistent brand aestheticSixty percent of the top brands on Instagram use the same filter for every post, according to an analysis by WebDam. Using the same filter over and over allows you to establish a look on Instagram that’s consistent with your overall branding—which people should recognize from your website and/or products. This will serve as a signal to users that your Instagram account is legit. 4. Make sure your Instagram username is the same as it is on other channelsSame concept as above. Consistent branding—text and visual—makes it easy for your followers on other platforms to find and recognize you on Instagram. 5. Include a link to your website on your profileAnother easy way to show that your account is authentic. But again, do not include a link to another network. Instagram says it won’t approve profiles that “contain ‘add me’ links to other social channels.” 6. Write a strong bioIt should showcase who you are and what you do, convey personality, include relevant keywords (for better discoverability) and a compelling call-to-action. More Instagram bio ideas and tips here. 7. Flaunt connections with verified accountsFor example, if you work for a brand that is already verified, include your title and the company’s Instagram handle in your bio. This will boost your credibility. 8. Choose the right profile photoIf you’re representing a brand, this should be the company’s logo. Whatever image you choose, make sure it follows Instagram’s recommended dimensions for profile photos: 320 x 320 pixels. It must also be centered so that it works with the circular format. 9. Resubmit your applicationIf at first you’re denied verification, take the time to follow the advice above to improve your profile and grow your audience. Once you’ve made the necessary changes and further establish yourself on the platform, there’s no harm in trying again. Ultimately, getting verified will depend on sticking to a winning Instagram strategy and building a dedicated following. Do that, have patience, and it could happen for you. Save time managing your Instagram presence using Hootsuite. From a single dashboard you can schedule and publish photos directly to Instagram, engage the audience, measure performance, and run all your other social media profiles. Try it free today. The post Here’s How to Get Verified on Instagram (Yes, Anyone Can Apply Now) appeared first on Hootsuite Social Media Management. Here’s How to Get Verified on Instagram (Yes, Anyone Can Apply Now) published first on https://themarketingheaven.tumblr.com/ via Tumblr Here’s How to Get Verified on Instagram (Yes, Anyone Can Apply Now) Do you happen to know your mobile phone’s hotspot name? Did you give it any thought if you renamed it?… The post What’s Your Mobile Phone’s WiFi Hotspot Name? appeared first on Peter Shankman. What’s Your Mobile Phone’s WiFi Hotspot Name? published first on https://themarketingheaven.tumblr.com/ via Tumblr What’s Your Mobile Phone’s WiFi Hotspot Name? 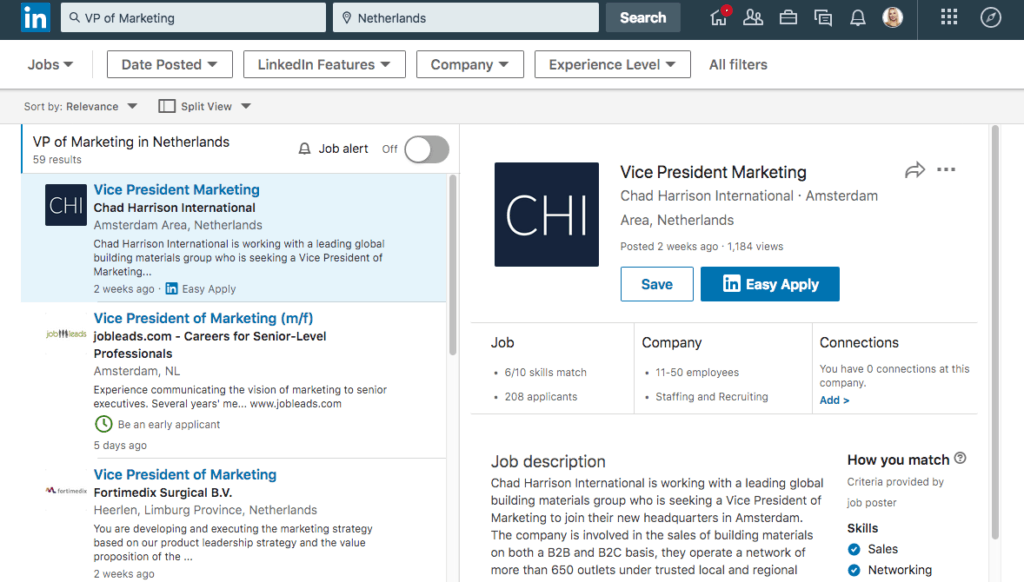   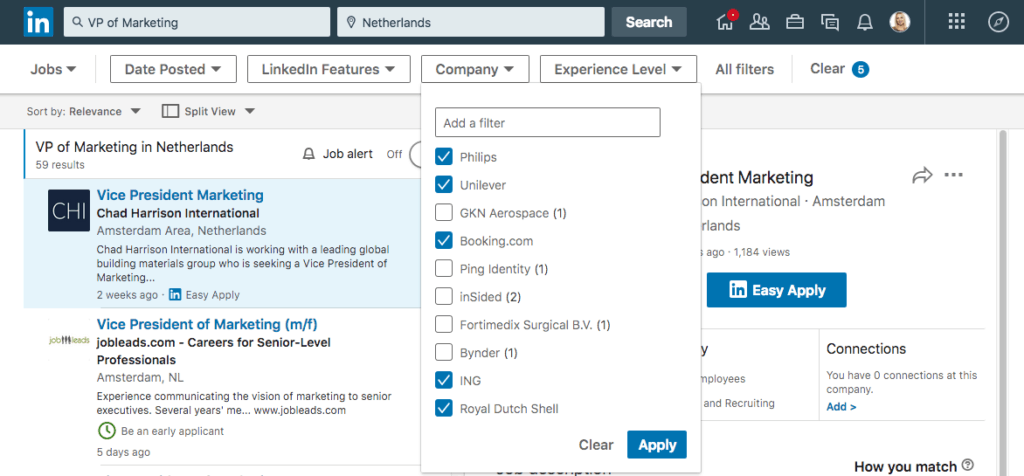                       The post How to Use LinkedIn Job Search to Land Your Dream Job appeared first on Top Dog Social Media. How to Use LinkedIn Job Search to Land Your Dream Job published first on https://themarketingheaven.tumblr.com/ via Tumblr How to Use LinkedIn Job Search to Land Your Dream Job The post 10 Tips to Help You Land a Job as a Freelance Blogger appeared first on ProBlogger.
This post is based on Episode 185 of the ProBlogger podcast. Whether you’re looking to become a full-time blogger, want to supplement your blogging income, or simply want to make a bit of money to support your own blog as it grows, finding a paid blogging job can help you go further, faster. Back in 2006 I started the ProBlogger job board. Since then we’ve had well over 10,000 jobs listed on that board. Typically there’s at least one new job each day, and often as many as five or six. Most of them are writing-related, but there are also jobs aimed at editors and other types of content creators. Featured jobs appear at the top of the board (where advertisers have paid a little extra), and the other jobs appear beneath them with the most recent at the top. There are usually three or four pages of active jobs at any given time. I even use the job board myself. Several times a year I advertise for writers for Digital Photography School. But while we get a lot of applications (often 60 or more), a lot of those applying don’t do themselves any favours. So today I’ll be sharing ten tips for applying for a job on the ProBlogger job board (or any other job board) in a way that will help you stand out for the crowd. Tip #1: If You See a Job You’d Like, Act Quickly!Advertisers sometimes remove a job within 24 hours of posting it because they managed to fill the position. Obviously you don’t want to send a rushed, half-complete application. But you should get it in fairly promptly. Here are a few ways to find out about the jobs as soon as they’re advertised:
By default, jobs stay on the board for 30 days. We encourage advertisers to close their jobs once they’re filled, but not everyone does this. If you see an older job that looks like a great fit for you, it’s fine to email the advertiser and check whether the job is still open before applying. Tip #2: Follow the Instructions in the Job ListingDifferent advertisers will want you to apply in different ways. And they often tell you exactly what they want from you. When advertising for Digital Photography School writers we’ve asked for specific things, such as examples of their work. We’ve also told applicants not to send in a full resume. But if you looked through the applications we get you’d be amazed how many people clearly didn’t read the instructions. If you apply for a job and don’t follow the instructions, it’s a signal to the advertiser that you don’t pay attention to detail. So make sure you read the job listing carefully and do everything you’re asked to do. Tip #3: Be Willing to “Sell Yourself”So many people applying for DPS jobs sell themselves short. I know it can be hard to write confidently about your skills and abilities. But you need to put your best foot forward and give people a reason to hire you. Talk about your previous experience, your knowledge, and your passion for the topic. Emphasise skills such as working with others or whatever else you can bring to the job. It’s not about selling yourself as something you’re not. It’s about making the most of everything you have. Tip #4: Write Your Application WellI’m always amazed at people who don’t proofread their applications. When you’re applying for a blogging job – which inevitably involves a lot of writing – your written application gives the advertiser an idea of how good you’ll be. If you send an application that’s well written, well structured, spell-checked, and grammatically correct, you’ll put yourself ahead of your competition. Proofread your application and, if you can, get someone else to proofread it for you too. Tip #5: Give Examples of Your Previous WorkMost of the jobs on our jobs board ask for examples of posts you’ve written previously. Sometimes they’ll ask for links to articles you’ve had published somewhere else. (Ideally these will be on someone else’s site, but articles on your own site is often fine too.) Sometimes they’ll ask for a document or PDF file with a sample of your writing. Look at what they’re asking for, and make sure you send your samples in their preferred format. When you’re deciding which pieces to use, think about:
Tip #6: Be Concise and Don’t Overwhelm the AdvertiserWhen I talk to advertisers who post jobs on the ProBlogger job board, they often tell me they’re getting a lot of applications. If they receive a long application, it can take them quite a while just to read and process it. So while you should include everything they ask for in your application, you should also be concise. This isn’t the place to tell them your life story. Don’t overwhelm the advertiser with tons of detail. Instead, select the most important information. Tip #7: Demonstrate a Knowledge of Blogging ItselfAs well as showing you know the topic area well (which I’ll get to in a moment), you need to show you understand the technical side of blogging. For instance, if you regularly share content on a blog, and you’re familiar with WordPress or another blogging tool, make sure you let the advertiser know. Give them a link to your blog, or tell them how long you’ve been using WordPress. These tell the advertiser that you’re serious about blogging and already have the skills you need. They’ll know they won’t have to invest time teaching you how to create a blog post in WordPress or how to add an image to a post. If you don’t already got a blog of your own, get one going. We have an entire free course to help you. Tip #8: Demonstrate Knowledge of the TopicI’m sure this is obvious, but people won’t employ you to write for their blog if you don’t have a good understanding of the topic. Ideally you’ll have already written about that topic. But you may be able to show your understanding of the topic in other ways. You may have had some training on it through work, or delivered workshops. Or maybe it’s a hobby you engage in extensively. Demonstrating you know their topic well and you’re up to date with the latest trends within it will add a lot to your application. Tip #9: Only Apply to Jobs That Are a Good Fit for YouIn the past few years I’ve found that some people apply for every job that appears on the job board. And it inevitably comes across in the applications, where are pretty much copied and pasted from one job to the next. Don’t give an advertiser the impression you’re desperate for any job. They want to know you’re a great fit for their job. Tailor your application to what they need, and make sure you have the skills they’re looking for. Tip #10: Demonstrate You’re Willing to Go Beyond Just WritingWhile it’s crucial to show advertisers you have the writing experience and abilities they’re looking for, you can also offer them something more. For instance, if you have experience in design, search engine optimisation, editing, creating video or anything like that, list it at the bottom of your application. It will show the advertiser they’re not just getting a writer. They’re also getting someone who can help with search engine optimisation, or create new types of content for their blog. You can also include links to your social network profiles, and tell advertisers you’re willing to promote the content you write on your social networks. This can be an added bonus for an advertiser, as it will help bring traffic to their site. If you follow even half of these tip you’ll immediately put yourself ahead of a lot of other people applying. Follow them all, and you’ll really stand out from the crowd. Check out the ProBlogger jobs board and see if there are jobs you’d like to apply for. Good luck with your hunt. Image credit: Grovemade The post 10 Tips to Help You Land a Job as a Freelance Blogger appeared first on ProBlogger. 10 Tips to Help You Land a Job as a Freelance Blogger published first on https://themarketingheaven.tumblr.com/ via Tumblr 10 Tips to Help You Land a Job as a Freelance Blogger |
Who We Are
An expert with more than 26 years encounter working inside the promoting and showcasing interchanges industry. Down to earth learning, comprehension and experience for an extensive variety of business orders including the monetary administrations, legitimate, business administrations, retail, on the web, magnanimous and common administration areas.
Social Links
|


 (@MelonieDodaro)
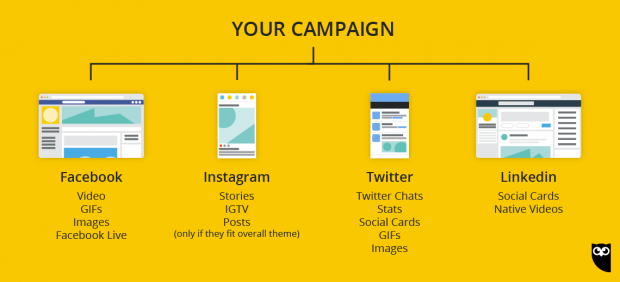


 RSS Feed
